
Headshot Retouching in 2026: How Much Editing Is Still Acceptable
A practical guide to headshot retouching in 2026: why over-editing reads as a lie before it reads as bad, the three tiers of retouching, what to fix on skin and what to leave, frequency separation, dodge and burn, eyes, teeth and hair, jaw and proportion, background cleanup, sharpening, AI headshots, the two-metre test, ethics and disclosure, common mistakes and a ten-minute order of operations.
ON THIS PAGE
#The Short Answer
| Retouch this | Leave this | The tell when you get it wrong |
|---|---|---|
| Temporary spots and blemishes | Moles, scars and marks that are part of the face | A patch of skin with no texture at all |
| Shine on the forehead and nose | The natural sheen of healthy skin | A matte forehead that looks painted |
| Colour casts from a window or a lamp | The warmth of the light on the face | A face that is cooler than the room around it |
| Stray hairs and flyaways | The direction and volume of the hair | An edge that has been painted in by hand |
| Slight under-eye shadow | The shape of the eye socket | Under-eyes that are brighter than the cheeks |
| Exposure and contrast | The shape of the nose and jaw | A face that no longer matches the neck |
| Distractions in the background | The texture of the wall | A background that bends around the shoulders |
| Small asymmetry in the smile | The gap in the teeth | Teeth that look like a single white strip |
| Overall sharpening | The grain and texture of the image | Halos along the hair and the jaw |
The rest of this article explains each row, why the tells appear, and where the line sits between correcting a photograph and replacing a person.
#Why Retouching Fails Before It Looks Bad
#The viewer reads the face, not the pixels
Human beings are extremely good at reading faces and extremely bad at explaining what they read. A face that has been over-retouched produces a reaction - something is off - long before the viewer can point at a cheek and say the texture is gone. That is why the argument "nobody will notice" is usually wrong: they will not notice the edit, they will notice the discomfort.
This matters because retouching is often judged at two hundred percent zoom, where every individual change looks defensible. The viewer is never at two hundred percent. They are looking at a thumbnail in a message list, a circle on a profile page, a face in a row of faces on a team page.
#The uncanny valley, in a headshot
The uncanny valley describes the dip in comfort that appears when something is nearly human but not quite. In a portrait it shows up as skin that is too even, eyes that are too bright, a jaw that is too smooth and a neck that has lost its shading. Each element is close to right, and the combination is wrong.
The mechanism is worth understanding, because it explains why "a little more" is the dangerous direction. Below a certain amount of retouching, the face still reads as human and the improvements are welcome. Past that point, every additional correction lowers the realism of the whole, even though every individual correction improved something.
#What the camera actually got wrong
Most of what a good retouch fixes is not the subject's fault. It is the camera's: a colour cast from a mixed light source, a shadow from a bad angle, a temporary shine, a sensor that clipped the highlights, a lens that softened the corners. Correcting those is restoration, not improvement.
That distinction gives a working rule. If the thing you are removing would not have been there in better light, on a better day, from a better angle, removing it is fair. If it would have been there anyway, you are no longer correcting the photograph.
#The Three Tiers of Retouching
#Tier one: correction
Correction is everything that makes the file technically right: exposure, white balance, contrast, highlight recovery, shadow lift, lens distortion, cropping, and noise. It changes no feature of the person. It is also where most of the visible improvement happens, which is why a well-corrected photo often needs almost nothing else.
A headshot that is correctly exposed, correctly balanced and correctly cropped will look professional with no skin work at all. That is not a compromise; it is the normal case.
#Tier two: cleanup
Cleanup removes temporary things: a spot, a shaving cut, a piece of lint on a collar, a stray hair across the cheek, a small distraction in the background. It follows a simple test - would this mark be gone in a week? If yes, remove it. If it is permanent, leave it.
Cleanup is the tier where restraint pays the most. Every removal makes the skin slightly more uniform, and uniformity is exactly what the eye reads as artificial. Twenty small removals on one cheek produce a different result from two.
#Tier three: enhancement
Enhancement changes the person: reshaping the jaw, slimming the face, enlarging the eyes, straightening the nose, lifting the neck. This is where the honest conversation sits, and where the answer depends on the purpose of the photo rather than on technique.
For a personal profile, it is the subject's own choice what to do with their own image. For a corporate team page, a professional directory, a conference speaker listing or anything a client uses to recognise you, the photo has a job: to identify a person accurately. Enhancement works against that job, quietly, and the cost usually lands on the person in the photo rather than on whoever edited it.
#Skin: What to Fix, What to Leave, and What to Ask
#The difference between clarity and smoothness
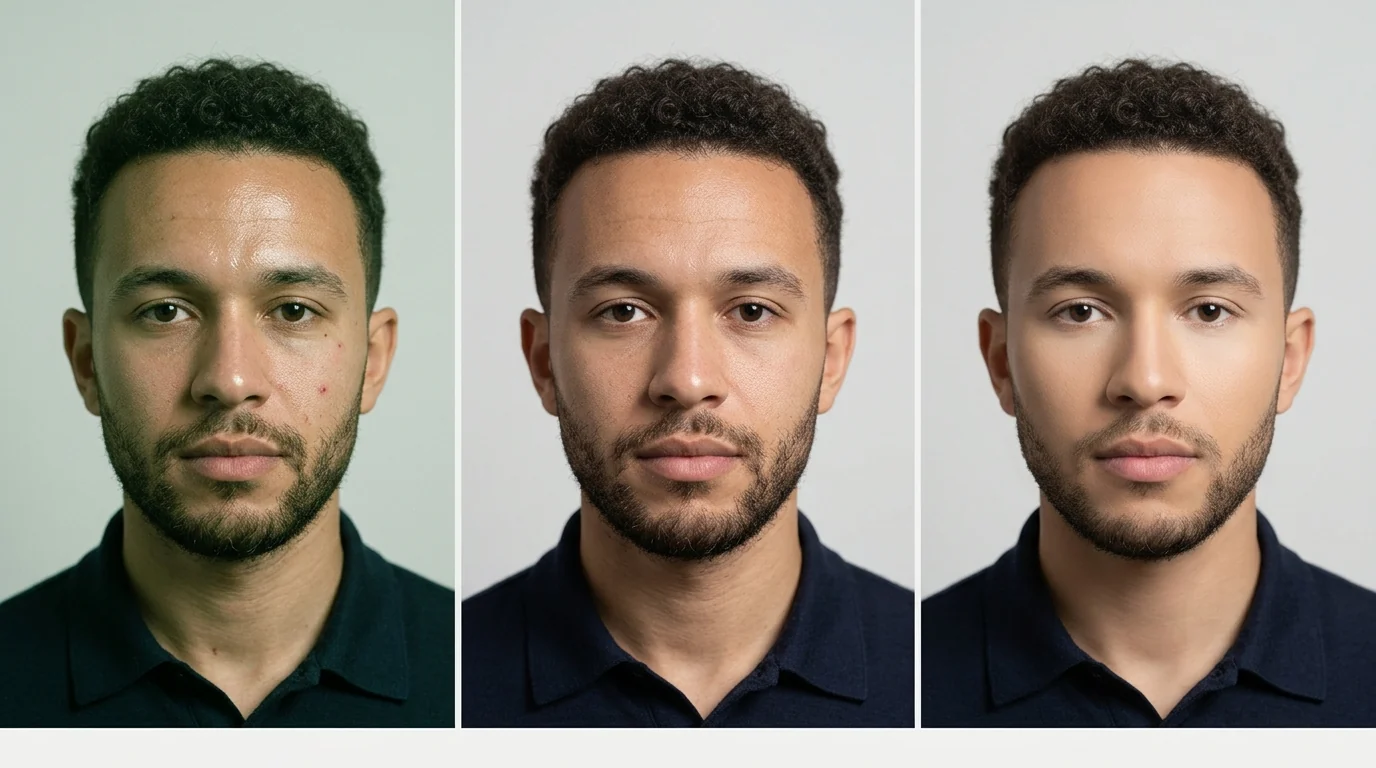
Clear skin still has pores, fine lines, small tonal variations and a gradient from the lit side to the shadow side. Smooth skin has none of those. The first reads as healthy; the second reads as a surface, and the eye stops seeing a person.
The practical target is to remove what distracts and keep what identifies. A blotchy red patch on the cheek distracts. A single pore does not. A deep crease between the brows distracts if it is darkened by a bad shadow, and does not if it is simply present.
#Temporary versus permanent
Divide marks into two columns before you touch anything. Temporary: a spot, a shaving cut, a scratch, a bruise, a piece of fluff, a hair in the wrong place. Permanent: a mole, a scar, a birthmark, a freckle pattern, a skin condition, a tattoo at the collar line.
The first column is fair game by default. The second column is a conversation, not a decision the retoucher makes alone - and the answer is often "leave it", because removing a distinguishing mark is one of the fastest ways to make a photo stop looking like the person it is supposed to show.
#What to do about acne and flare-ups
A flare-up is a temporary condition, so the default leans towards removal - but the goal is a version of the person on a good day, not a different skin type. Remove the inflamed spots, soften the general redness, and keep the texture and the tonal variation of the surrounding skin.
The failure mode is treating a flare-up as a smoothness problem. Blurring an entire cheek to hide three spots removes the evidence of skin everywhere, and the result looks less like a good day and more like a mannequin.
Pores, fine lines around the eyes, the small creases at the corners of the mouth, the texture of the forehead and the gradient from the nose to the cheek should all survive a normal retouch. So should the stubble line on a jaw, the natural sheen on a nose, and the difference between the skin on the face and the skin on the neck.
If a retouch removes the neck texture but leaves the face alone, the mismatch is immediately visible. That single inconsistency - a smooth face above a textured neck, or the reverse - is one of the most common tells in amateur retouching.
#Frequency Separation Without Jargon
#What the technique actually separates
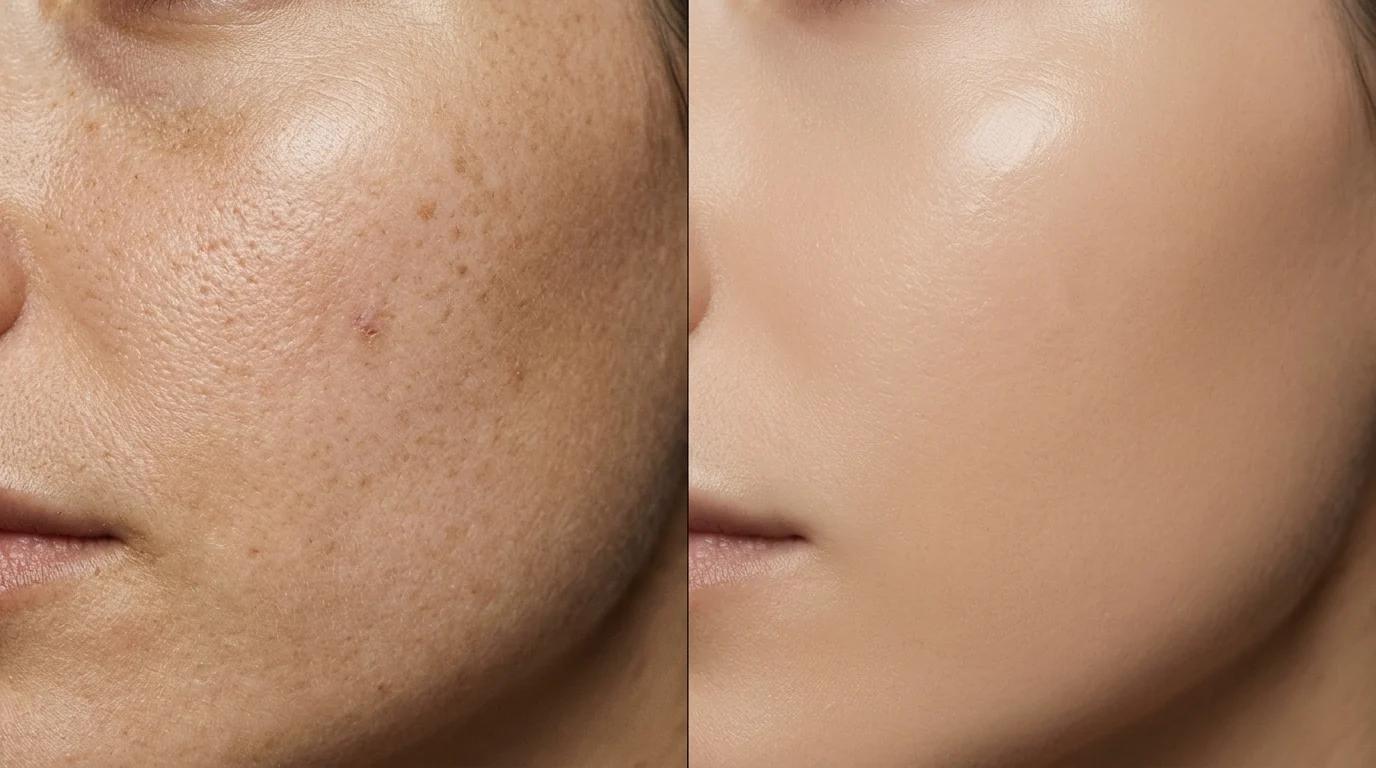
Frequency separation splits an image into two layers. One carries the low-frequency information: colour and broad tone, the blotchy patches, the shadows, the overall shape. The other carries the high-frequency information: pores, hairs, fine lines, the texture of the skin.
Once they are apart, you can work on either one without touching the other. Smoothing the colour layer removes blotchiness without flattening the pores. That single property is the whole reason the technique exists, and it is why it produces a result that ordinary blurring cannot.
#Why it looks more natural than blurring
Blur is a low-pass filter: it removes texture and colour variation together. On a face, that means the pores go at the same rate as the blotches, and the moment the blotches are gone the skin is already too smooth.
Frequency separation lets you take the blotches without the pores. The face keeps its surface while losing the unevenness, which is exactly what a good retouch does - and it is why the technique became standard in commercial portrait work rather than staying a specialist trick.
#The limits of the technique
Frequency separation is a tool, not a licence. Pushed hard, it produces a waxy, airbrushed surface where the colour is flat and the texture is still there but evenly distributed, which is its own kind of wrong. The texture of a cheek should vary; a perfectly even layer of pores looks like a texture map applied to a sphere.
It also fails on hard edges. Around the eyes, the nostrils, the lips and the hairline, the split between colour and texture does not align with the anatomy, and smoothing across those boundaries produces smudges. Work in small areas, keep the brush soft, and zoom out often.
#Light, Colour and Sharpening
Almost every indoor headshot has a colour cast, and almost every retouch should start by removing it. A window on one side and a warm bulb on the other produces a face that is amber on one cheek and blue on the other, and no amount of skin work will make that look right.
Correct the dominant cast first, then decide whether the secondary one is acceptable. A slightly warm face against a slightly cooler wall reads as real light; a perfectly neutral face in a room that is visibly warm reads as a cut-out.
#Dodge and burn
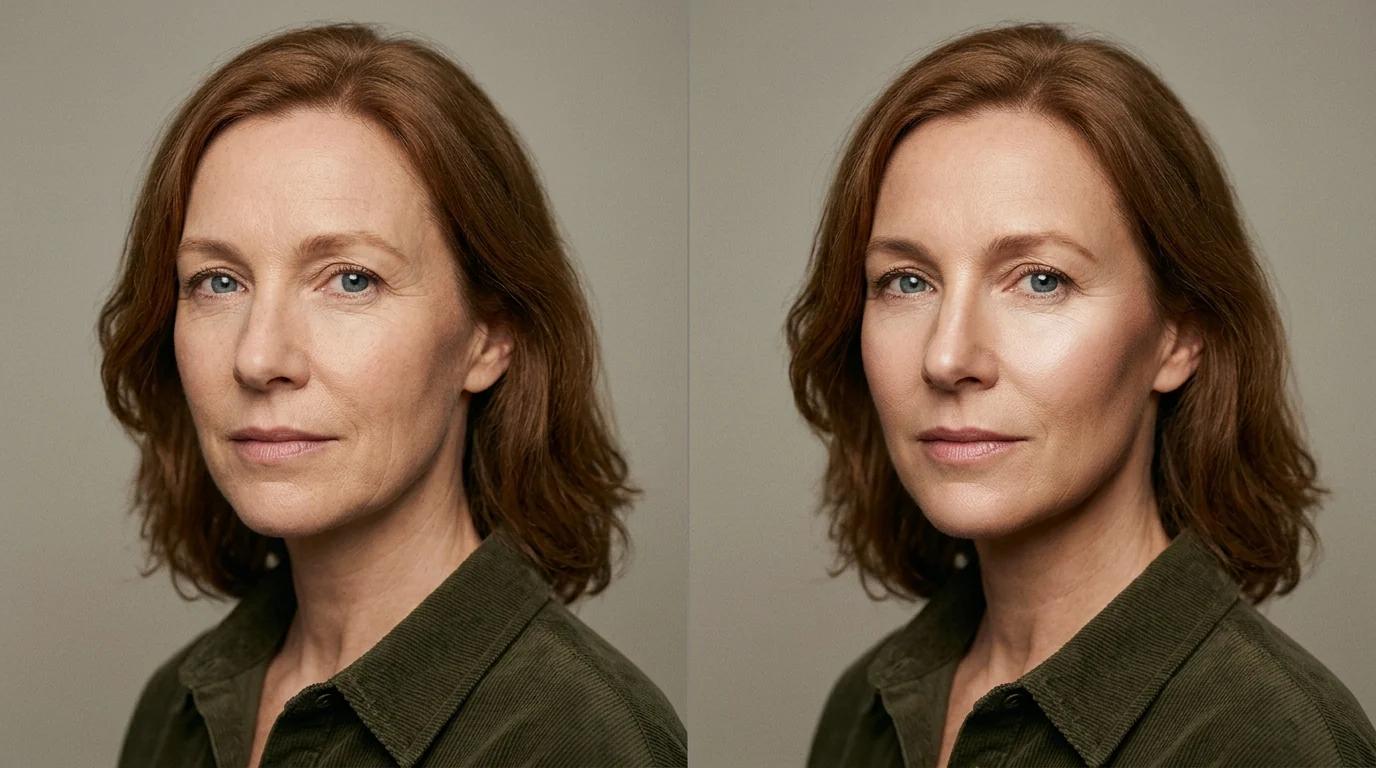
Dodging lightens, burning darkens, and together they shape a face without moving a single feature. A little dodging on the cheekbones and the bridge of the nose, and a little burning along the jaw and the edge of the face, does more for a portrait than any amount of smoothing.
The classic failure is over-burning the edges until the face looks like it has been outlined. The second is dodging the under-eye area until it is brighter than the cheek below it, which reads as a mask. Both are visible at viewing size even when they look subtle at full zoom.
#Sharpening is the last step
Sharpening increases local contrast at edges, and it should happen once, at the end, at the output size. Sharpening early and then resizing, or sharpening twice, produces halos: bright rims along the hair, the jaw and the collar that are invisible at a glance and obvious in a row of photos.
Skin and sharpening fight each other. A global sharpening pass that is right for the eyes and the eyelashes will over-sharpen pores and stubble. The usual solution is to sharpen the whole image lightly and then mask the effect away from the skin, keeping it on the eyes, the hair, the lips and the clothing.
#Eyes, Teeth and Hair
#Eyes: brighten, do not lighten
The whites of the eye are not white. Brightening them to pure white produces the flat, staring look of a stock photo. Lift them slightly, keep a little warmth, and leave the natural shading at the corners of the eye where the lid meets the eyeball.
The same applies to the iris. A small lift in contrast makes the eye read as alive; a hue shift towards a more saturated colour reads as a contact lens. If the goal is a photograph of a person, both the white and the iris should keep the colour they actually are.
#Teeth: the strip problem
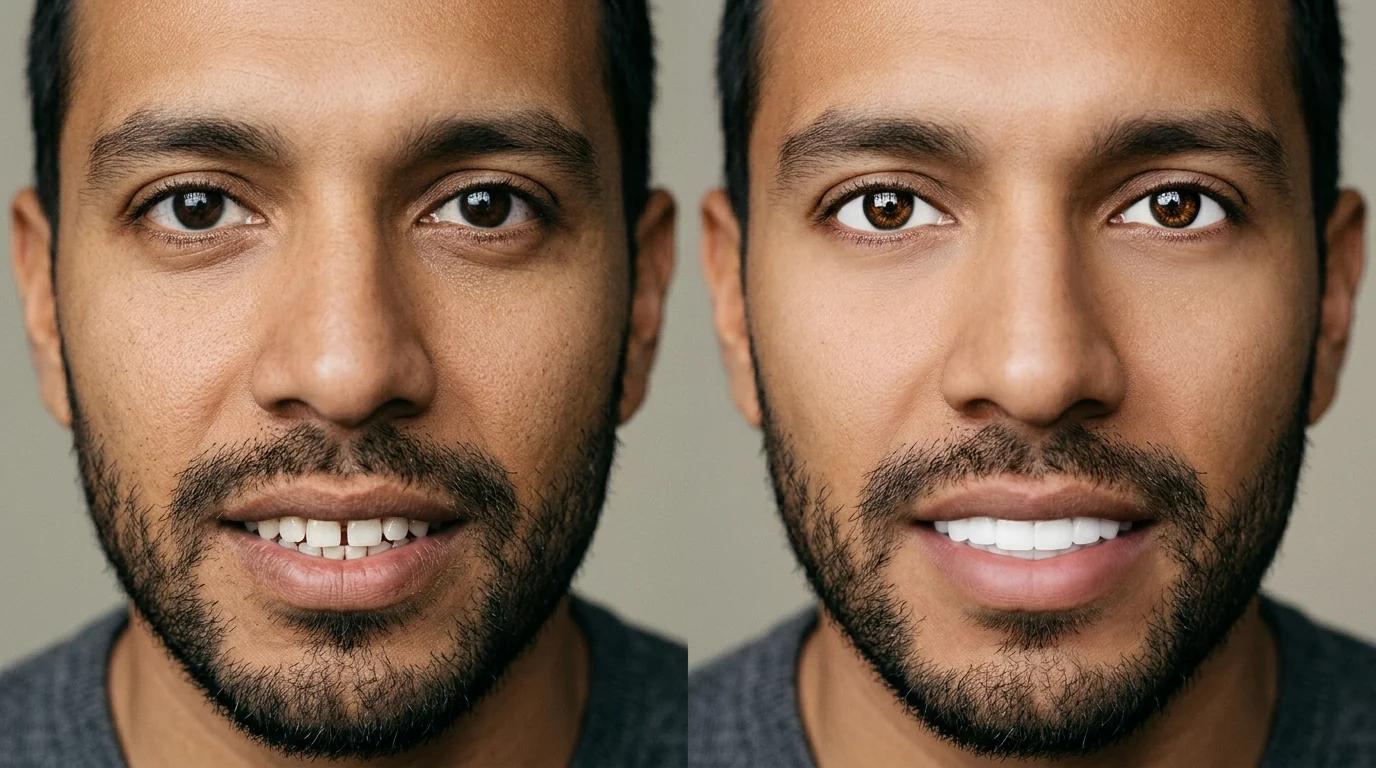
Whitening teeth is the most over-applied edit in headshot retouching. Push it far enough and the individual teeth stop being visible, the gaps disappear, and the smile becomes a single bright band. That band is one of the clearest signals that a photo has been worked on.
The target is even, not white. Remove the yellow cast, equalise the brightness between the front teeth and the ones behind, and keep the separation between them. Teeth should look clean, and they should still look like teeth.
#Hair: the edge that gives it away
The edge where hair meets background is where bad retouching hides. Painting in missing strands, cloning the background over flyaways and smoothing the silhouette all produce an edge that is too clean, and an unnaturally clean hairline is visible at every size.
Work with the hair, not against it: remove the strands that cross the face rather than the ones that give the head its shape, and if you must clone background over a stray hair, keep the result irregular. A slightly messy edge reads as real; a perfect one reads as a cut-out.
#Jaw, Body and Proportion
#Where proportion edits start to show
Reshaping a jaw, slimming a cheek or lifting a neck changes the relationship between elements that the viewer already knows. The classic tells are a neck that is narrower than the head, an ear that sits at the wrong distance from the eye, and a background line that bends.
It is worth knowing that these are not subtle to everyone. People who have seen the person in real life notice a change in jaw shape almost immediately, even when they cannot say what changed. That is the honest cost of a proportion edit on a photo other people will use to recognise you.
#Shoulders and neck
Two adjustments do most of the work and are almost impossible to overdo: straightening the shoulder line slightly, and lifting the shadow under the jaw so the neck reads as longer. Neither changes the person's shape; both change how the shape is read.
What does not work is narrowing the neck. It is one of the most requested edits and one of the most damaging, because the head then appears too large for the body. The eye judges proportion, and it is unforgiving.
#When the honest answer is a reshoot
If the edit required is large enough that it would change the identity of the person, the photograph has failed before the retouching started. A different camera angle, a different light, a different pose or a different shirt usually solves in five minutes what retouching attempts to solve in an hour, and the result is real.
This is not a moral argument, it is a practical one. Reshoots produce better photographs than rescue attempts, because a photograph that was right in camera needs almost nothing afterwards.
#Background and Distraction Cleanup
#What counts as a distraction
A distraction is anything the eye lands on before the face: a bright window, a lamp, a picture frame, a socket, a cable, a piece of text, a second person at the edge of the frame. Removing those is uncontroversial and usually improves a portrait more than any skin work.
Text is the most important category. Any readable word in a headshot competes with the face, and a logo or a brand mark in the background creates problems that go beyond aesthetics.
#Cloning without a visible seam
Clone from an area with the same texture, the same brightness and the same direction of light. A wall with a gradient cannot be cloned with a single flat sample; the result is a patch that is visibly a different tone. Sample from a region a few centimetres away in the direction of the gradient, and blend the edges with a soft brush at low opacity.
The tell to watch for is repetition: the same patch of texture appearing twice. Rotate the clone source and vary the size, and check the result at viewing size rather than at full zoom.
#Removing what should not be removed
Two cases deserve a pause. The first is a background element that carries information - a bookshelf that says something about the person's work, a workshop, a studio. Removing it removes context that was the point.
The second is a background that has been blurred digitally rather than optically. A cut-out edge around the hair and a background with no depth of field gradient reads as a composite, and the eye catches it before the mind explains it.
#Retouching an AI Headshot
#What AI gets wrong that retouching can fix
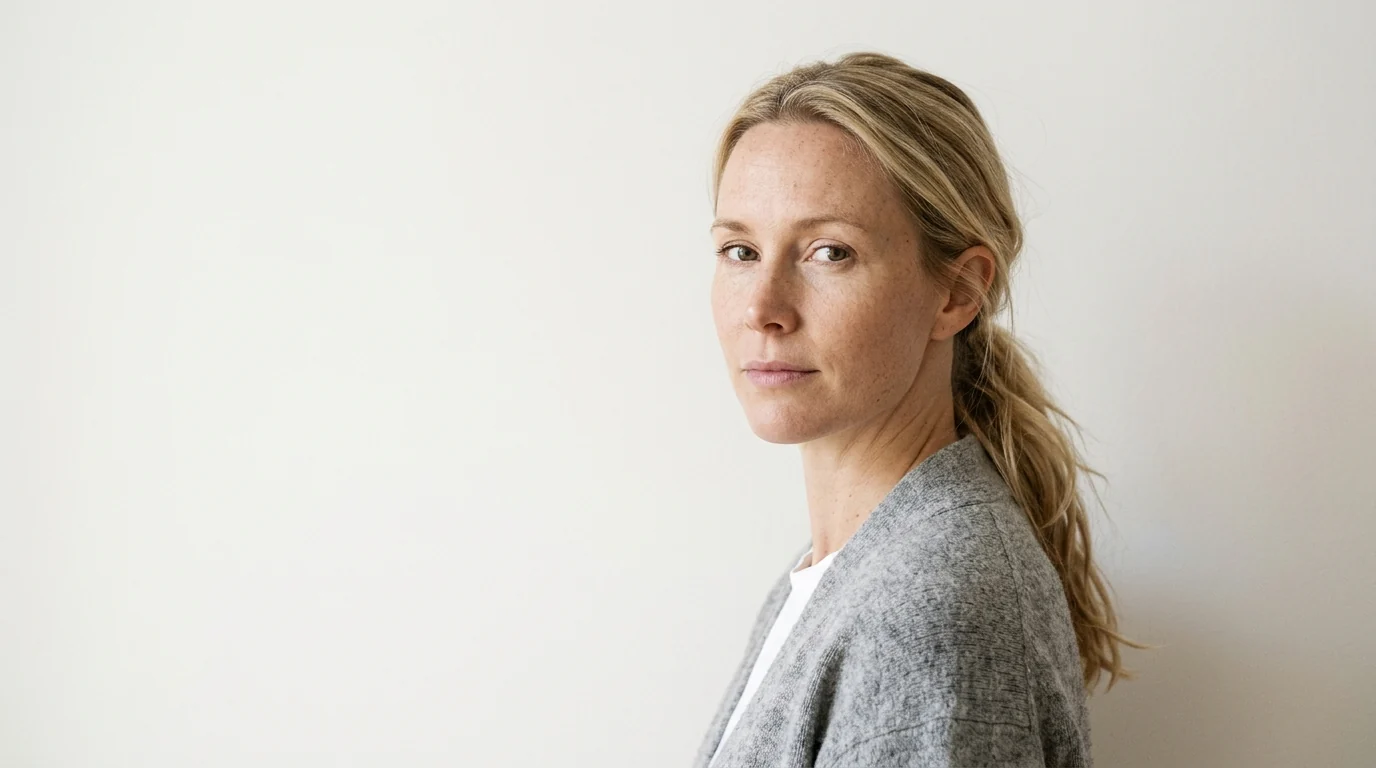
An AI portrait usually arrives with a different set of problems from a camera photograph. The skin is often already too smooth, because the model learned from retouched images. What tends to be wrong instead: the edge where hair meets background, the line of the collar, an eye that points slightly away from the other, a soft patch where the model had less information, and occasional asymmetry in the glasses.
Retouching an AI headshot is therefore mostly consistency work rather than beauty work. Compare the left and right sides of the face, check that the ears sit at the same height, and look at the transition from the neck to the jaw.
#What not to sharpen
AI images carry artefacts: small areas of false detail, repeated patterns in fabric, and edges that are slightly too crisp. Sharpening those makes them worse, because sharpening increases exactly the contrast that the artefact lives on.
The safer approach is to reduce sharpening on the whole image, mask it away from the skin and the background, and apply it only to the eyes, the eyebrows and the hair. If a region looks wrong at full size, soften it rather than sharpen it.
#The honesty question
The same disclosure logic applies here as anywhere else. A generated portrait that is not a photograph of the person raises a question the retoucher cannot answer alone: whether the context expects a photograph. For a personal profile it may be fine; for a professional directory, an identity document or a client-facing team page, it usually is not.
#When to Stop: The Two-Metre Test and Platform Crops
Export the photo, open it at the size it will actually be seen, and look at it from two metres away. At that distance you cannot see pores or individual corrections; you see a face. If the face reads as a photograph of a person, stop. If it reads as an image that has been worked on, go back and undo the last three steps.
The test works because it matches how people actually encounter a headshot: in a message list, a search result, a team page, a printed programme. Nobody views a profile photo at full resolution, and the corrections that only survive at full resolution were never the point.
#Crops change what matters
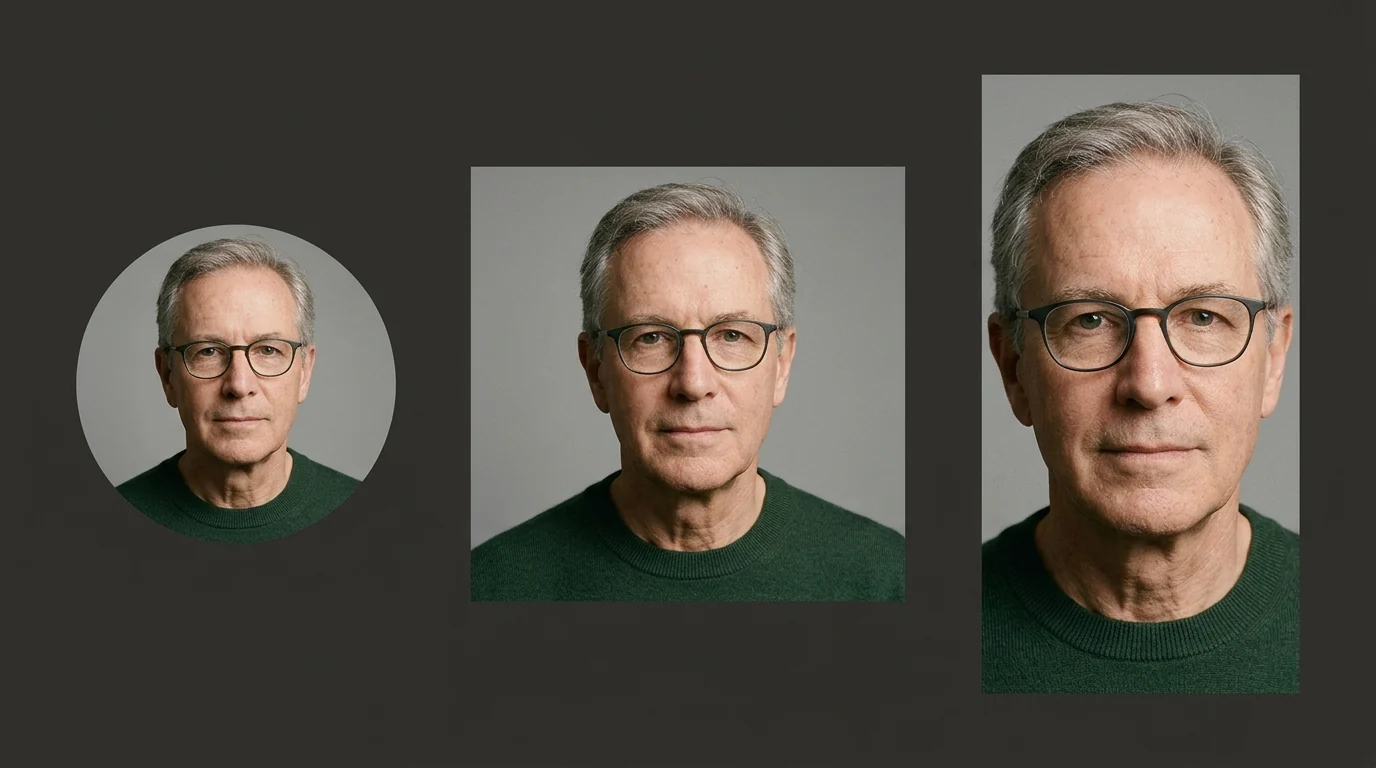
LinkedIn shows a small circle. A résumé shows a rectangle. A conference page often shows a square with the face large. A website team page may show a narrow vertical strip. Each crop puts a different part of the retouch under the eye.
A retouch that looks fine in a square can look wrong in a circle, because the circle crops the corners where the background and the shoulders sat. Check the photo in the shapes it will actually appear in before deciding the edit is finished.
| Where it appears | Shape | What the crop exposes |
|---|---|---|
| Profile photo | Small circle | The corners of the frame and the shoulder line |
| Directory listing | Square | The background either side of the head |
| Team page | Tall rectangle | The neck and collar, and skin texture under the jaw |
| Speaker listing | Wide landscape | The whole background, including anything cloned |
| Print programme | Small rectangle | Sharpening halos, which survive resizing |
#Stop at the point of clear
The practical rule is to stop when the skin becomes clear rather than when it becomes smooth, when the eyes become engaged rather than bright, and when the face becomes evenly lit rather than flat. Each of those pairs describes the same edit pushed one step too far.
#Ethics, Disclosure and Workplace Rules
#Correction, enhancement and identity
The useful distinction is not between edited and unedited, because almost every published photograph is edited. It is between edits that preserve identity and edits that replace it. Correcting a colour cast preserves identity. Reshaping a jaw does not.
That line is not moral absolutism; it is a practical description of what a headshot is for. A headshot exists so that someone can recognise you. Every edit that moves away from recognition works against the purpose of the photo.
#Where the rules actually exist
Employers, professional bodies and platforms increasingly say something about this, and the rules differ by context. Some workplaces ask for a recent, unedited photo for internal directories. Some professional registers require a photograph that identifies the member. Some platforms require disclosure of synthetic media.
The safe habit is to ask what the photo has to do before deciding how far to edit it. A dating profile and an identity badge are not the same brief, and neither is a conference speaker page.
#Disclosure
If a portrait has been generated rather than photographed, or has been edited beyond recognition, saying so is usually cheaper than being asked. The conversation that follows an undisclosed edit is worse than the edit was ever worth, particularly in a professional context where the photo is a small part of a larger relationship.
#Common Retouching Mistakes
#Six things that make a headshot look edited
- Smoothing an entire face instead of a patch. The uniformity is the tell, not any single correction.
- Brightening the under-eyes past the cheeks. The face starts to read as a mask.
- Whitening teeth until the gaps disappear. The smile becomes one bright band.
- Sharpening twice, or sharpening before resizing. Halos appear along the hair and the jaw.
- Fixing the face and forgetting the neck. The texture mismatch is visible at every size.
- Removing a mark the person considers part of their face. The photo stops being a portrait of them.
#Why the last edit is always the problem
Retouching is cumulative, and each step is judged against the previous one rather than against the original. That is how a face ends up smooth: not through one decision to erase the texture, but through twelve decisions that each removed a small amount of it.
The remedy is mechanical. Put the original and the current version side by side at viewing size every few minutes, and keep a layer that you can toggle. The comparison is uncomfortable precisely because it works.
#A Ten-Minute Retouch Order of Operations
#The sequence
- Correct the exposure and the colour cast, then crop for the shape the photo will be used in. Nothing after this is trustworthy until the tonality and the frame are final.
- Clean up temporary marks and stray hairs. Small, separate, on their own layer.
- Even the skin tone without touching the texture. Frequency separation or a soft brush at low opacity.
- Dodge and burn for shape, then sharpen once at output size, masked away from the skin. Cheekbones, jaw, the edge of the face.
- Run the two-metre test and stop.
#What to skip when you are short of time
If you only have three minutes, do the first two steps and the last one. Corrected exposure, correct colour and the right crop account for most of the difference between an amateur and a professional-looking headshot, and skin work is the part that most often makes things worse.
The order matters more than the time spent. A ten-minute retouch done in the right sequence beats a forty-minute retouch done in the wrong one, because the early decisions change what the later ones need to fix.
#Frequently Asked Questions
#How much retouching is acceptable on a headshot?
Enough to correct what the camera got wrong, and not enough to change what the person looks like. In practice that means temporary things come out - a spot, a stray hair, a shine on the forehead, a colour cast from a window - while permanent features stay: the shape of the nose, the line of the jaw, the texture of the skin, the gaps between the teeth. If a colleague who sees you every day would notice the difference, the edit has gone past the line.
#Does retouching a headshot make it dishonest?
Correcting light, colour and temporary blemishes is not dishonest, in the same way that washing your face before a meeting is not dishonest. Changing your face shape, age or body is a different question, and the answer depends on the context: a personal profile photo is your own choice, while a corporate team page or a professional directory usually has an expectation that the photo identifies you accurately. When in doubt, disclose or stay close to the original.
#What is frequency separation in retouching?
A technique that splits a photo into two layers: one holding colour and tone, the other holding fine texture. You smooth the colour layer without touching the texture layer, so skin loses blotchiness and keeps its pores. It exists because ordinary blurring removes both at once, which is what produces the waxy, plastic look most people recognise as over-edited.
#Should I remove all my skin texture in a headshot?
No. Texture is what makes skin read as skin rather than as a surface. Removing pores, fine lines and the small variations in tone entirely produces the flat, painted look that viewers read as artificial even when they cannot name the reason. Reduce what distracts - blotchiness, an uneven patch, a harsh highlight - and leave the texture that identifies a real face.
#How do I retouch a headshot without making it look fake?
Work in small steps on separate layers, and look at the image at full size on a large screen rather than on a phone. Zoom out to one hundred percent and then to the size the photo will actually be viewed at, and stop as soon as the skin starts to look smooth rather than clear. The most common cause of a fake look is not one big edit but a series of small ones that each seemed reasonable.
#Can I retouch a headshot on my phone?
Yes, for the basics: brightness, contrast, a colour cast, a stray hair, a small blemish. What phones make difficult is restraint, because most editing apps apply strong smoothing by default and preview it at a small size where the damage is invisible. If you retouch on a phone, use the manual sliders rather than the automatic beauty filters, and check the result on a larger screen before you publish it.
#How do I fix a shiny forehead or oily skin in a photo?
Reduce the specular highlight rather than the brightness of the whole area. Select the shine, then lower its brightness and lift its contrast slightly so the highlight becomes a soft sheen instead of a bright patch. Heavy blurring of a shiny forehead removes the texture underneath and produces a patch that looks plastic against the rest of the face, which is usually more noticeable than the shine was.
#What should I never retouch in a headshot?
Anything that identifies you: the shape of your nose, the line of your jaw, the set of your eyes, the gap in your teeth, a mole that is part of your face, the texture of your skin. Also avoid obvious tells - a neck that has been blurred until it matches the face, a background that bends around the shoulders, and hair edges that have been painted in by hand. These are the details that make a viewer feel something is wrong without being able to explain it.
#How long should retouching a headshot take?
For a single professional headshot, ten to twenty minutes is the normal range for a careful edit: colour, exposure, a light skin clean-up, a small amount of dodge and burn, and sharpening. Anything beyond about forty minutes on one photo is usually a sign that the edit is drifting, not that it is getting more precise. Most of the visible improvement happens in the first ten minutes.
#Does retouching damage image quality?
Repeated edits and repeated saves do, because each step re-encodes the file. That is why retouching should be done from the original raw or high-quality file, on a layered document, with the export happening once at the end. Sharpening especially should be the last step, because sharpening an image twice produces halos around the edges that are visible at full size.
#Should I retouch an AI-generated headshot?
Yes, but for a different reason. An AI portrait usually needs less skin work and more fixing of the details models get wrong: the edge where hair meets background, the neck line, an eye that does not match the other, and the occasional soft patch where the model lost confidence. Retouch towards consistency rather than towards beauty, and be careful not to sharpen artefacts that the model introduced.
#What is the two-metre test for retouching?
Look at the finished photo at the size it will actually appear - a phone screen held at arm's length, or a printed copy viewed from two metres away - and ask whether it reads as a photograph of a person or as an image that has been worked on. Most retouching problems are invisible at full zoom and obvious at viewing size, because that is where the eye judges the whole face rather than individual pixels.
#The Bottom Line
Retouching is not a measure of skill; it is a measure of judgement. The techniques are simple and most of them are available in free tools. What separates a good retouch from a bad one is almost entirely the decision about where to stop, and that decision is easier when you know what the photo is for.
Correct what the camera got wrong. Remove what would not have been there next week. Leave what identifies the person. Then look at the result at the size it will actually be seen and stop before the skin becomes smooth. That sequence, done in ten minutes, will beat an hour of careful work in the wrong direction.
If you are building the portrait itself, our headshot generator works from photos you upload, and Natural Glow handles skin tone without flattening texture. For the rest of the setup, headshot lighting decides how much there is to correct, headshot posing decides where the shadows fall, and headshot backgrounds decides how much cleanup the frame needs.
#Methodology and Sources
This guide separates three kinds of statement:
- Published: a named reference source.
- Practical: a technique from portrait and retouching practice, labelled where it is judgement rather than measurement.
- Opinion: a recommendation from this team, such as the preference for correction over enhancement.
Sources checked on 13 November 2026:
- Wikipedia, Photo retouching. The history and conventions of retouching, including the distinction between corrective and cosmetic work.
- Wikipedia, Frequency separation. The signal-processing basis of the technique, and why separating colour from texture preserves detail that a blur would remove.
- Wikipedia, Dodging and burning. The darkroom origin of the two techniques and their digital equivalents.
- Wikipedia, Uncanny valley. The discomfort response to near-human but not-quite-human representations, which describes the reaction to over-retouched skin.
- Wikipedia, Color cast. How mixed light sources produce a colour cast and why it must be corrected before other work.
- Wikipedia, Dynamic range. The reason highlights and shadows clip, and why recovery has limits.
The tier structure is a teaching convention rather than a published classification. The claim that most viewers notice a jaw edit before they can name it is a practical observation from portrait work, not a measured finding. Statements about how a phone, a webcam or a generative model respond to retouching describe the behaviour of those tools, not the appearance of a specific person.
#Explore Other Nothron Tools
Nothron is not just a headshot generator - it is a complete AI photo studio:
#AI Tools
- Nothron Neural Engine - Sharpen, upscale, and clean up a low-resolution photo
- Nothron Natural Glow - Improve skin tone without making the face look artificial
- Nothron Legacy Touch - Restore an older photo before you rebuild your set
#Photo Editing Tools
- Photo Editor - Adjust brightness, contrast, and background details
- Free Online Image Cropper - Crop to the ratio each app expects
- Free Online Circle Cropper - Preview how a photo reads as a circular avatar
#Dashboard Tools
- Nothron Neural Headshot Generator - Create dating and professional portraits with AI
- Dashboard Neural Engine - Advanced AI photo enhancement
- Dashboard Natural Glow - AI-powered skin tone enhancement
- Dashboard Legacy Touch - AI old photo restoration
#Other Blog Posts
- Headshot Posing in 2026 - Angles, chin, shoulders and hands that look natural
- Headshot Lighting in 2026 - Position, size and colour of the light on a face
- Headshot Backgrounds in 2026 - Colour, depth and settings behind the face
- What to Wear for a Headshot - Colour, collars and fabric that survive a camera
- LinkedIn AI Headshot Authenticity - How to keep a portrait recognisably you
- 2026 Best Photo Editor Comparison - What each editor actually does well
#Author Biography
Nothron Team is a group of AI and photo editing experts dedicated to building the best AI headshot generator and photo editing platform. With years of experience in AI technology, computer vision, and professional photography, we built Nothron as a platform where anyone can create studio-quality portraits. Our mission is to make professional photo editing accessible to everyone through advanced AI technology.
Nothron Team
The Nothron team turns experience in AI, computer vision and professional photography into a photo studio that anyone can use.
Related articles
Headshot Posing in 2026: Angles, Chin, Shoulders and Hands That Look Natural
Nov 12, 2026 · 28 min read
Headshot Lighting in 2026: How to Light a Face With One Lamp or One Window
Nov 11, 2026 · 33 min read
Headshot Backgrounds in 2026: Colour, Depth and Settings That Look Professional
Nov 10, 2026 · 27 min read